
Adding a mantle and hearth to a fireplace can be an easy and high impact update. It also gives a super cozy feel to the space!


BEFORE: The fireplace was just a wall insert with some tile below it. And then there was this “hole-in-the-wall” that was intended for storing firewood. It was functional, and ok but I wanted a bit more from the space.

I spray painted the fireplace with Rustoleum High Heat Ultra Black spray paint to get rid of the gold stripe. I covered the firewood storage with some spare wood I had, and I built the hearth box out of pine stud 2 x 4’s. The hearth was then covered with cement block (this was mandatory per local housing code). (*It”s always a good idea to check with your local inspector when doing home projects).

Next, the fireplace was surrounded with the same cement board. Per building requirements, there had to be at least 6″ of cement board surrounding the actual fireplace. I purchased 4 hearth stones from my local stone supplier. During this time, carpet was also installed in the basement.

To save myself A LOT of extra cutting of the tile surrounding the fireplace, I decided to add extra cement board so I could have 2 full rows of the tiling. This tile came in sheets, so shown above is 2 rows of tile. I used black trash bags to protect the newly laid carpet from the thin set and grout.
However, because of this decision, I had to move the switch that turns the ventilation on/off to the fireplace. We’ll come back to this later.

Once all the tile was installed and grouted (including between the 4 hearth stones), I started on the mantle. These were built from standard pine 1 x 6’s. On the inside of the pillars, there is a 2 x 4 attached to the wall. The pillars were then attached to the 2 x 4’s.

These were then stained with Varathane Kona to match other wood work that was in the room.

The top portion of the mantle was built and stained to match the side pillars. The top of the mantle was attached to both the wall (using a hidden 2 x 4) and the pillars.

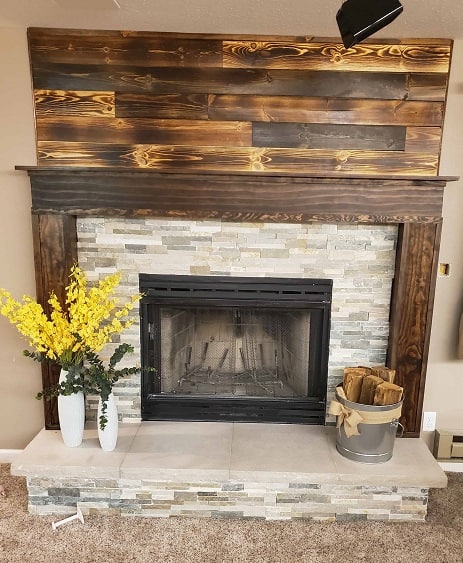
I added burnt shiplap planks above the fireplace mantle. This helped tie the fireplace into a shiplap accent wall in the same room.

The switch that turns on/off the ventilation for the fireplace was then installed into the side of one of the pillars.

I added some decorative pieces, including a bin to hold firewood (since the hole-in-the-wall is now buried behind the mantle). Please disregard the toys in the room, that was my kids’ addition to the photo 🙂 How do you think it turned out?
Happy DIY’ing!