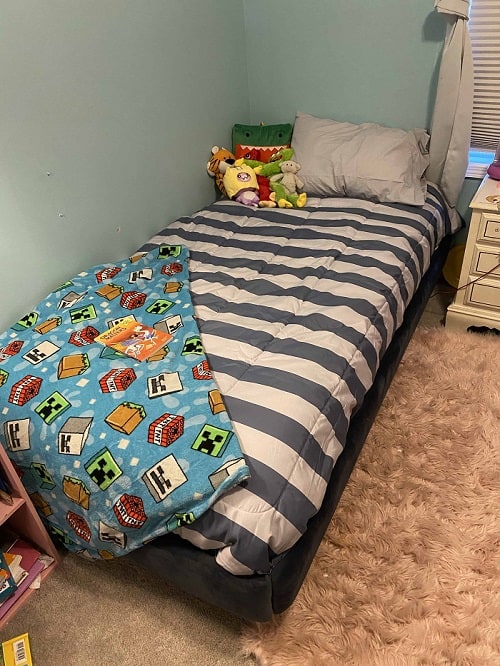
Make this super simple bed frame to add some a bit of soft and cozy material around you (or your kids’) bed! I built two of these (in twin size). One for each of my older kids, and my toddler loved it so much I’m planning on building her bed the same way! Let me know what you think!


Tools Needed:
- Saw (hand saw, chop saw, circular saw, etc.)
- Driver (impact Driver, Drill, screwdriver, etc.)
- Scissors or Box Cutter
- Measuring Tape
- Staple gun
Material List:
The amount of materials needed will depend on the mattress size for the frame you are building. See Table 1 for materials needed based on mattress size.
- Lumber
- Pine 1 x 6
- Pine 1 x 2
- Pine Stud 2×4
- Metal Frame
- Wood screws (1″ and 2 1/2″)
- 1″ foam padding
- Cotton Batting
- Spray Adhesive
- Staples
- Fabric of your choosing – I used a navy blue plush fabric from Joann Fabrics. You will need at least 3 yards to avoid sewing.

Table 1 – For Example: For a Twin Bed Frame, you will need: 2-8 foot Pine 1 x 6’s, 2-8 foot Pine Stud 2 x 4’s, 2-8 foot pine 1 x 2’s, 13-4 foot 1 x 3 slats, 1 roll of 72″ x 24″ foam padding, and 1 roll of 47″ x 59″ Cotton Batting.
Cut List:

Steps:
Step 1 – Cut the lumber per the cut list
Step 2 – Prepare the bed frame.

Assemble the bed frame.


Attach the 2 x 4’s to the bed frame. Using 1″ screws, attach the 2 x 4 through the 2 holes in the middle section of the metal frame.
Step 3 – Prepare the outer frame

Gather your materials (and some “helpers” if you prefer).


Lay the boards on the foam padding. Spray both the foam and the boards with the spray adhesive. Cut the foam so it’s about 1 inch bigger than the board on all sides.


Lay the foam and board on the cotton batting and your fabric (MAKE SURE you are laying your fabric the right way – with the “good side” facing out. Also, if your fabric has a pattern, make sure you like the way it’s facing on the outside before you start stapling.)
Starting on the outside edge, staple from the middle, and work your way out to both ends.
Once the first side is done, switch over to the other long side. Starting from the middle again, work your way out to both ends. Each of the long sides should now be secure.

To secure the ends, first fold in the two sides, and staple to the end of the board. (Think: wrapping a christmas present)


Secure the middle first, then one side, and then the other. It doesn’t need to be pretty, this will be completely hidden once installed. It’s more important to make sure the fabric is secure.

Repeat these steps until all 3 boards are complete!
Step 4 – Assemble the frame

To assemble the frame, take the 1 x 2 pine board and place it between the 2 x 4 inner frame, and the upholstered outer frame. Then, using 2 1/2″ wood screws, start on the inside and screw into the 2 x 4, through the 1 x 2 and into the upholstered frame board. You want the upholstered frame board to be about 1″ below the metal frame. I added 5-6 screws on each side, and 3-4 screws on the end to ensure it was sturdy enough.

Attach the left and right side first, and the end piece last.

Using 1″ screws, attach the top boards into the 2 x 4’s. Pro-tip: I used my measuring tape as a spacer between boards to make sure the boards were evenly spaced.


Add the mattress and the bedding, and voila, a custom built soft and cozy bed frame!
Happy DIY’ing!


Build a 4 drawer dresser in 10 easy steps - Two Hands DIY
[…] built this rustic wood dresser for my kids’ room. I recently updated their room with new upholstered bed frames, and I wanted to have a double chest of drawers bureau dresser in between their beds. There is a […]